
12 Simple DIY Halloween Decorations for Restaurants (With Step-by-Step Instructions)
Twelve simple DIY Halloween decorations for restaurants, from painted pumpkins to jar lanterns: materials, time, cost, step-by-step instructions and safety tips.
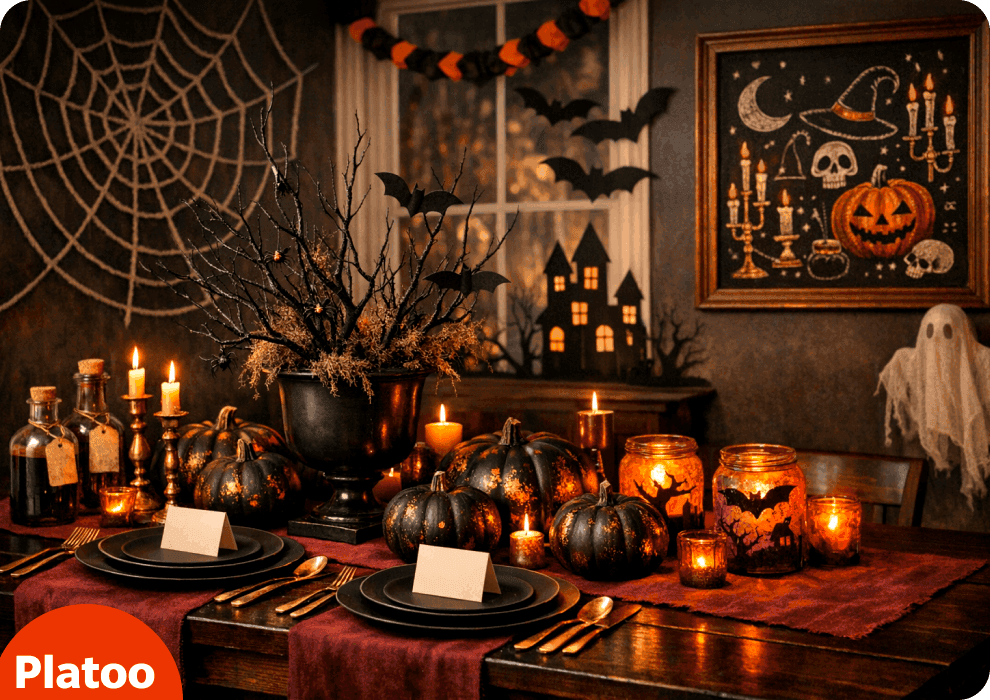
It’s mid-October. The café across the street already has bats in the window, and your dining room still looks like September. You don’t need a designer or a big budget to catch up. Most of these homemade Halloween decorations use paper, paint, jars and old bottles. Each one takes an afternoon or less. For every decoration you get a materials list, time, cost, difficulty and short steps. You also get one tip that keeps it safe in a busy restaurant.
Tables and centrepieces
Guests look at the table first. They sit there for an hour or more, so small details get noticed. Start here if you only have one free afternoon.
Painted pumpkins
A no-carve pumpkin painted in black, white and copper makes a simple centrepiece for each table.
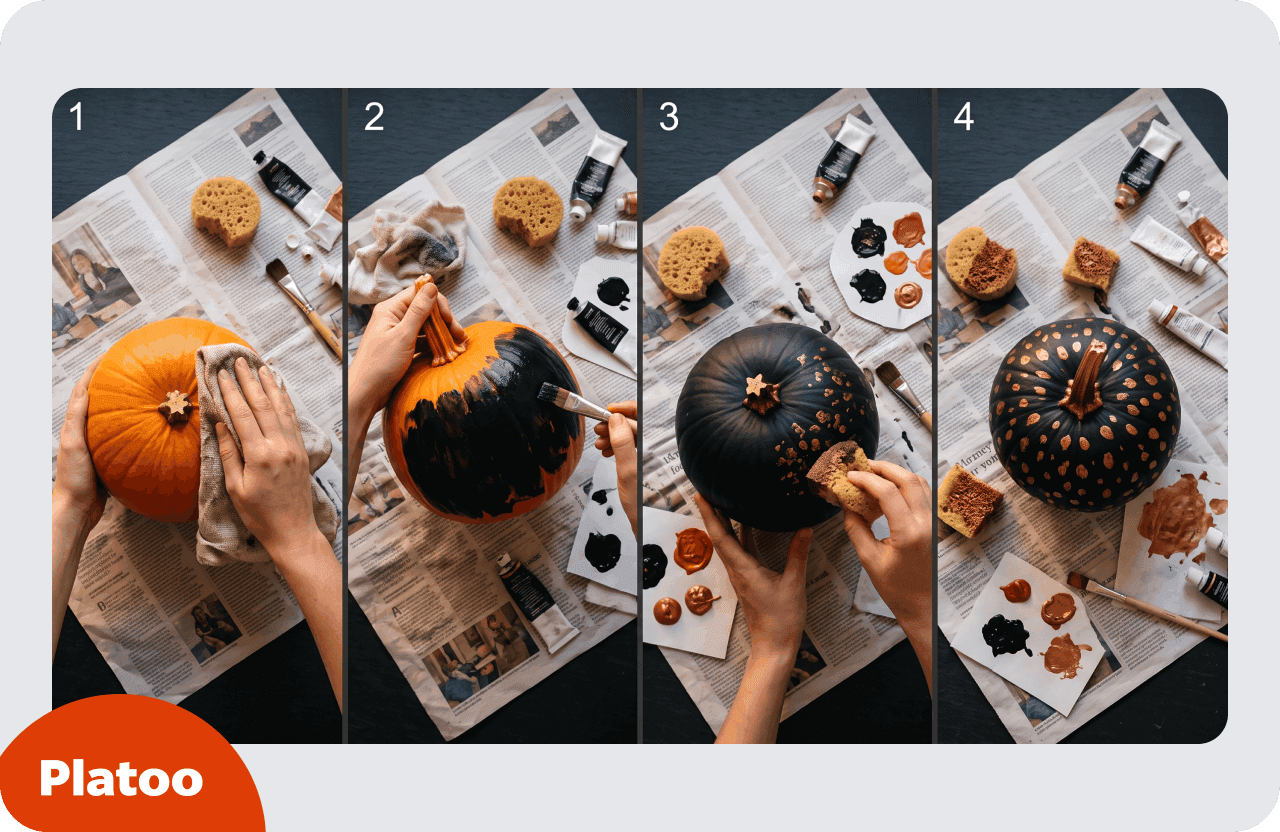
You’ll need: real or faux pumpkins, acrylic paint (black, white, copper), sponge and small brush, newspaper
Time: 45–60 min per pumpkin + drying (drip style up to 48 h) · Cost: Very low · Difficulty: Easy
How to make it
- Pick a firm pumpkin with no soft spots and wipe it clean.
- Paint the top and sides black and let it dry. Then paint the base. Add a second thin coat.
- Dab copper spots on with a sponge, or paint a white pumpkin with black stripes along its natural lines.
- Paint the stalk copper and let the whole pumpkin dry fully.
Restaurant tip: Uncarved pumpkins last much longer and don’t drip, so paint them a day ahead and keep them away from plates until fully dry.
Black branch centrepiece
Bare branches painted matte black look dramatic in a large urn at the bar or entrance.
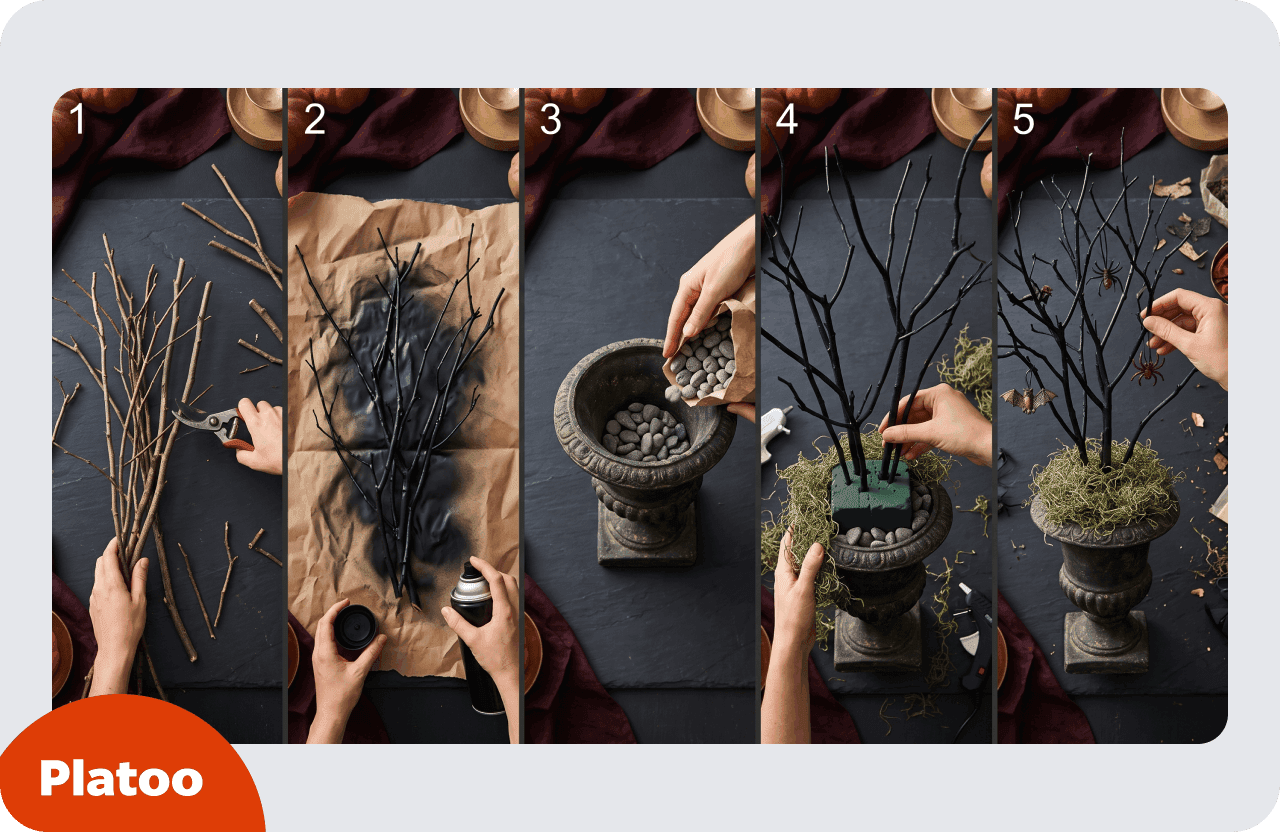
You’ll need: fallen branches, matte black spray paint, urn or pot, pebbles, floral foam, Spanish moss, hot glue, rubber bats or spiders
Time: about 1–2 h + paint drying · Cost: Low · Difficulty: Easy
How to make it
- Collect fallen branches and cut them to the height you need.
- Spray two even coats of matte black paint outdoors, on paper.
- Fill the bottom of the urn with pebbles so it can’t tip over.
- Glue floral foam on top, push the branches in with space between them, and cover the foam with moss.
- Add rubber bats or spiders.
Restaurant tip: Keep tall versions off small tables so guests can see each other, and hang only plastic bats or battery lights, never candles.
Mini pumpkin table numbers
A tiny faux pumpkin holds a table number or “reserved” card.
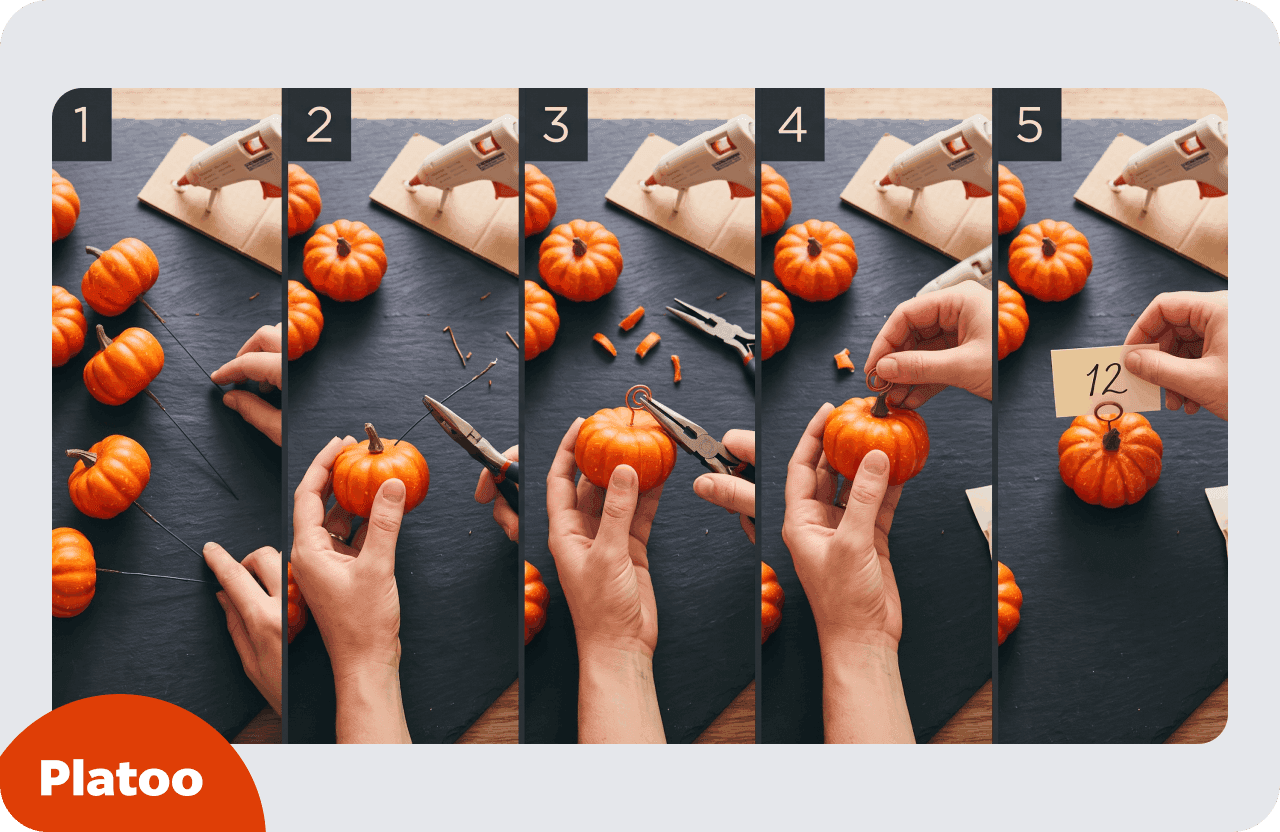
You’ll need: pumpkin floral picks (faux mini pumpkins), wire cutter or pliers, hot glue, card for numbers or names
Time: 5–10 min each · Cost: Very low · Difficulty: Easy
How to make it
- Heat the glue gun.
- Cut the wire pick off close to the base so the pumpkin sits flat.
- Bend the end of the cut wire into a small loop, like a “6”.
- Glue the wire in behind the stem and hold it for a minute or two.
- Slide a number or name card into the loop.
Restaurant tip: Faux pumpkins survive the whole season, so one set of holders covers every table until the end of October.
If time is short, do the pumpkins first. They take the longest to dry.
Windows and entrance
That’s the table sorted. Now think about the people walking past outside. A window is free advertising that works even when you are closed.
Window silhouettes
Large black paper shapes on a street-facing window work day and night.
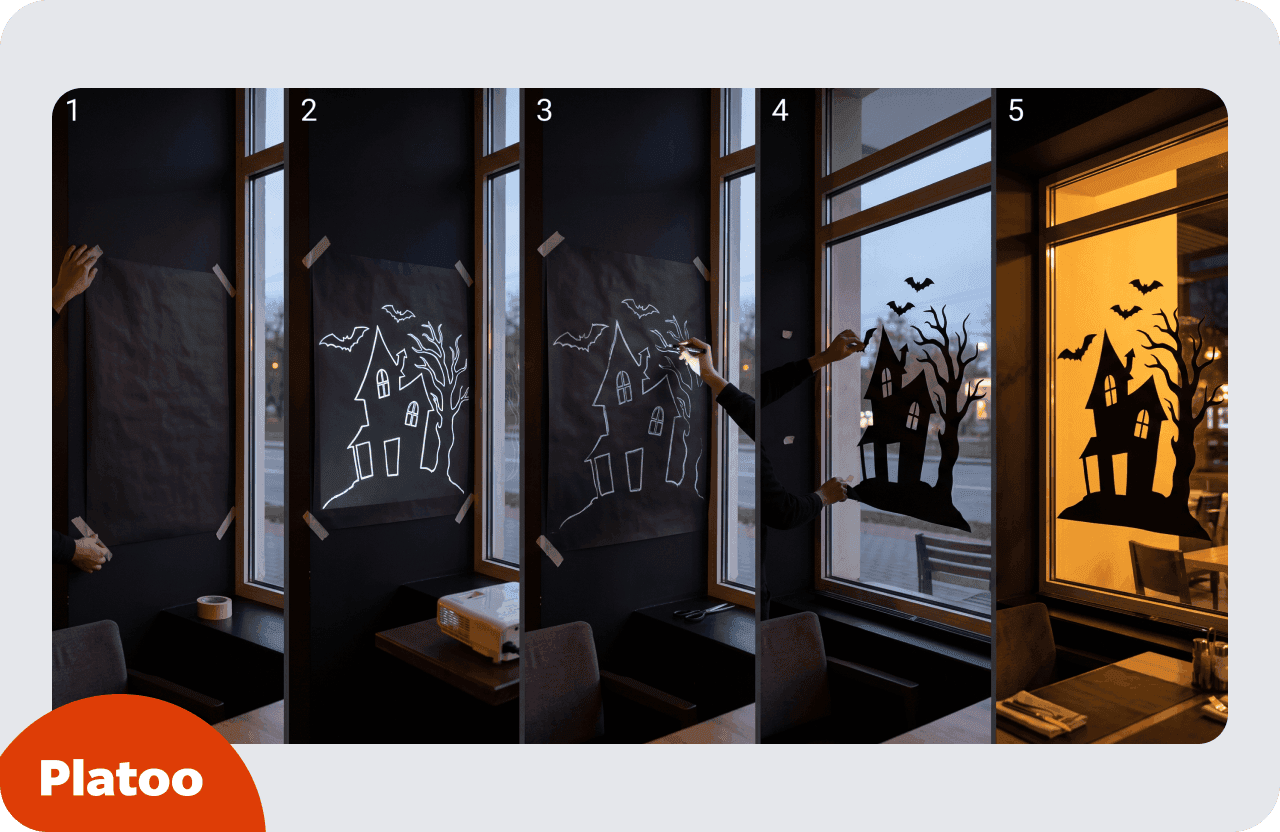
You’ll need: black craft paper, projector or printed template, chalk marker, clear tape, scissors
Time: 2–3 h for a large window · Cost: Low · Difficulty: Medium
How to make it
- Wait until dark and tape black paper to a wall near the window.
- Project the image and size it to fit the window.
- Trace the outline with a chalk marker and cut it out.
- Fix it to the glass with light tape first, then check the view from the street.
- Secure it with strong clear tape.
Restaurant tip: Keep fire exits and exit signs completely clear when you plan the layout.
Cheesecloth ghosts
Small stiff fabric ghosts look good on a window sill or host stand.
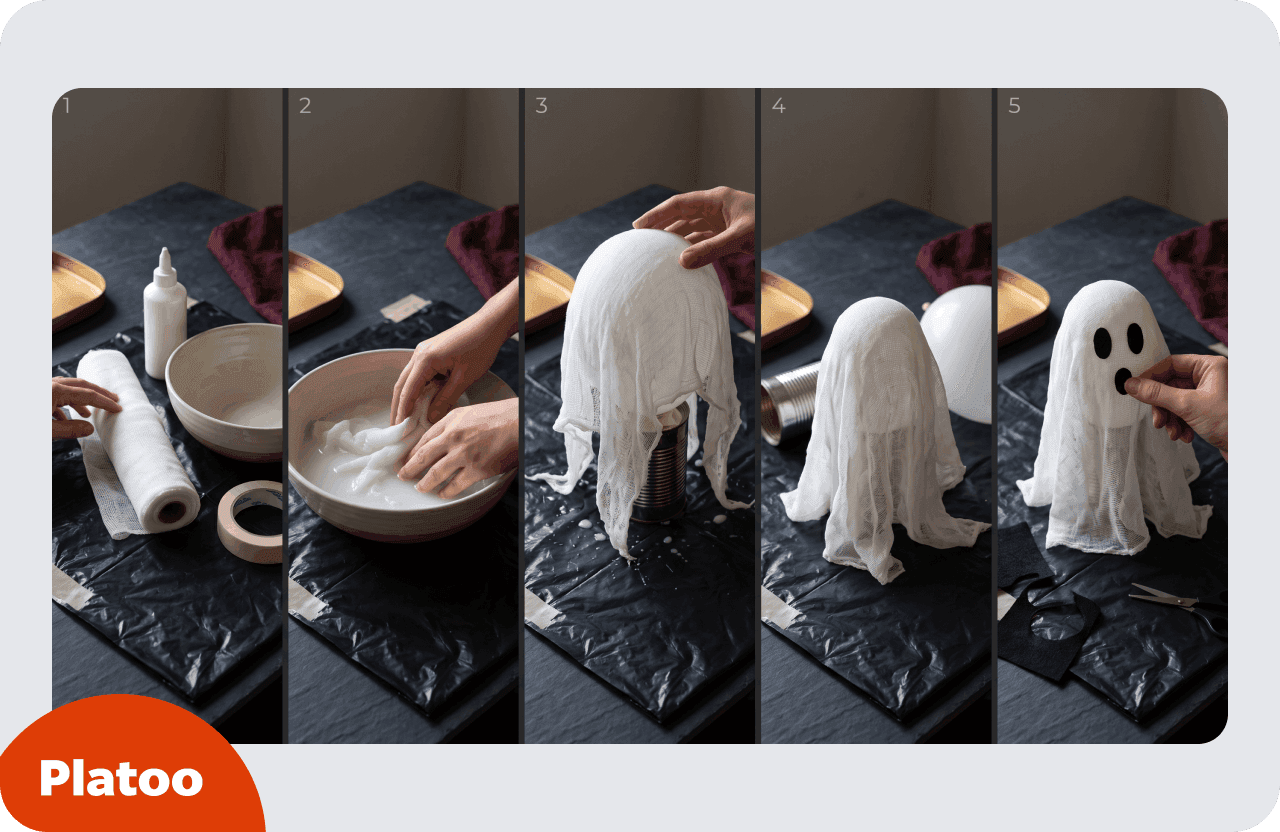
You’ll need: cheesecloth, PVA glue mixed half and half with water, balloon, tin can, black felt, bin bags
Time: 10–15 min + overnight drying · Cost: Very low · Difficulty: Easy
How to make it
- Cover the table with bin bags.
- Mix glue and water in equal parts and soak the cheesecloth in it.
- Put a balloon on a tin can and drape the wet cloth over it.
- Leave it to dry overnight, then pop and remove the balloon.
- Cut eyes and a mouth from black felt and glue them on.
Restaurant tip: Fabric burns easily, so keep the ghosts away from candles, heaters, lamps and food service areas.
Yarn spider web
A giant web made from black yarn fills an empty corner by the door.
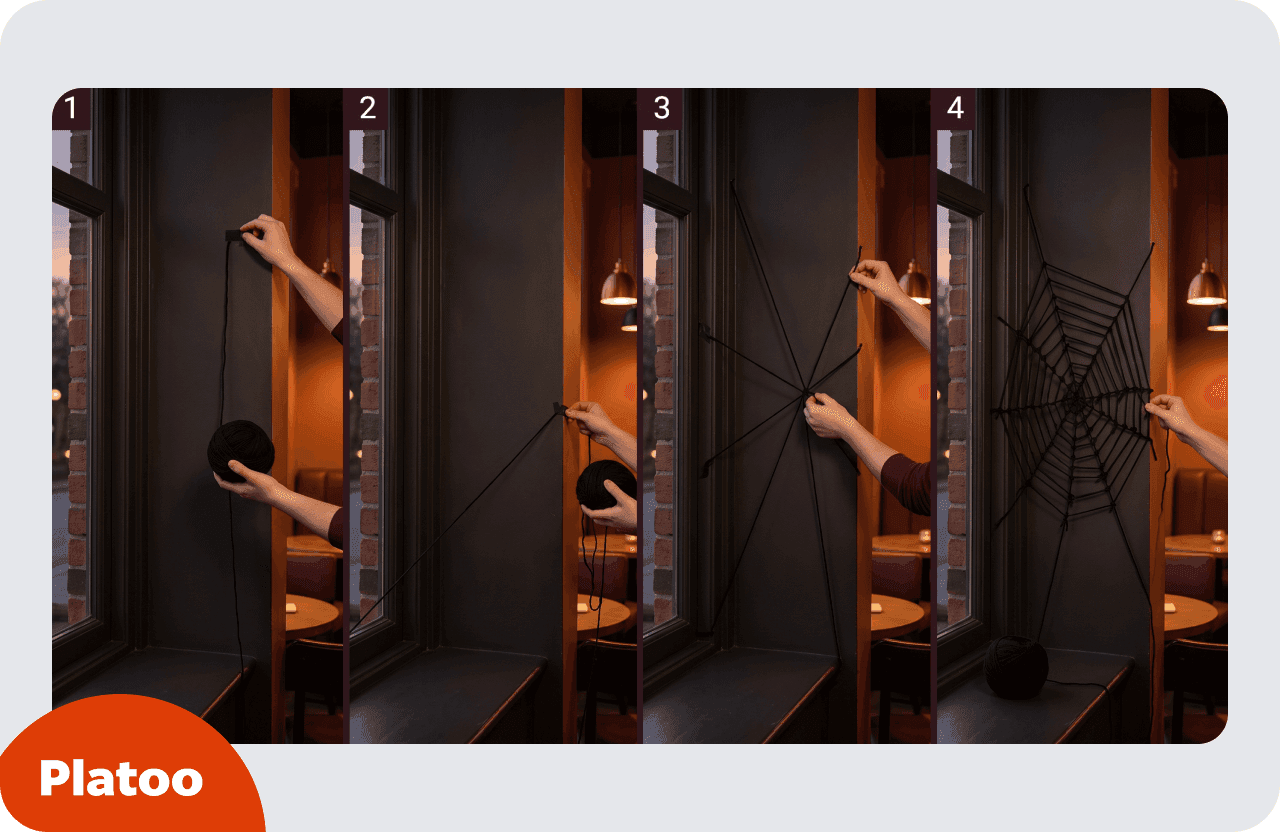
You’ll need: black yarn, velcro tape or removable hooks, scissors, hot glue (optional)
Time: about 1 h · Cost: Very low · Difficulty: Easy
How to make it
- Fix one end of the yarn in a corner with a small piece of velcro.
- Stretch a long thread across the bottom to set the size of the web.
- Run threads from the centre out to the edges, like spokes.
- Work around the spokes in rings, tying or gluing each crossing.
Restaurant tip: It’s reusable and safer than stretchy fake cobweb, but keep it away from lights, doors and exit routes.
Pick one strong idea for your Halloween window decorations. One big silhouette works better than ten small ones.
Walls, ceiling and bar
Inside, the walls and the bar are where guests spend time looking around. These Halloween decoration ideas use things you already have: old bottles, a specials board, spare paper.
Paper bat swarm
A swarm of black paper bats “flies” across a wall toward the bar.
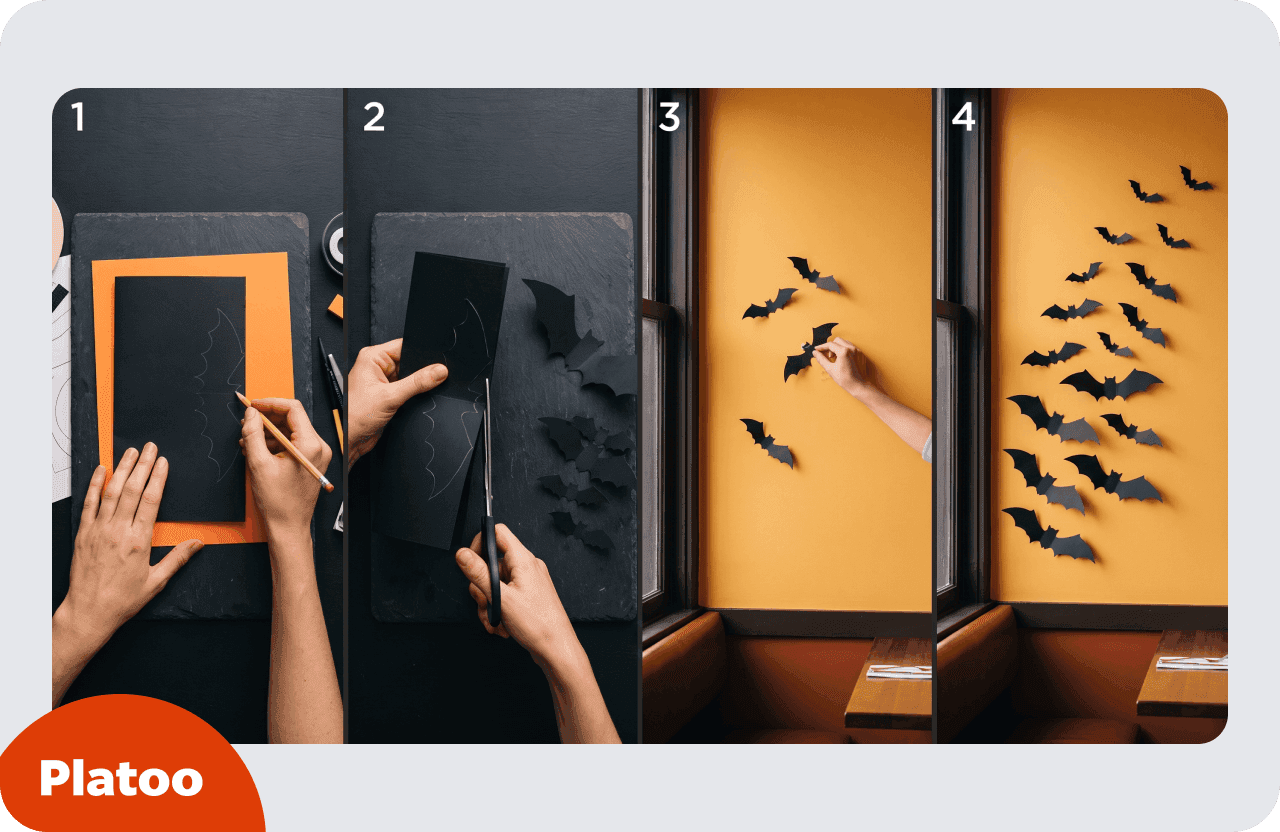
You’ll need: black paper or card, bat template, scissors, reusable adhesive (Blu Tack)
Time: 1–2 h for 30–50 bats · Cost: Very low · Difficulty: Easy
How to make it
- Fold the paper in half and trace half a bat against the fold.
- Cut along the line and open the bat. Repeat in two or three sizes.
- Stick the bats on the wall with reusable adhesive.
- Put larger bats lower and smaller ones higher, so the swarm looks like it is flying away.
Restaurant tip: Reusable adhesive protects the paint, and the bats store flat for next year.
Paper garland
A folded paper chain of pumpkins, cats, bats or ghosts runs along the bar back or the top of a window.
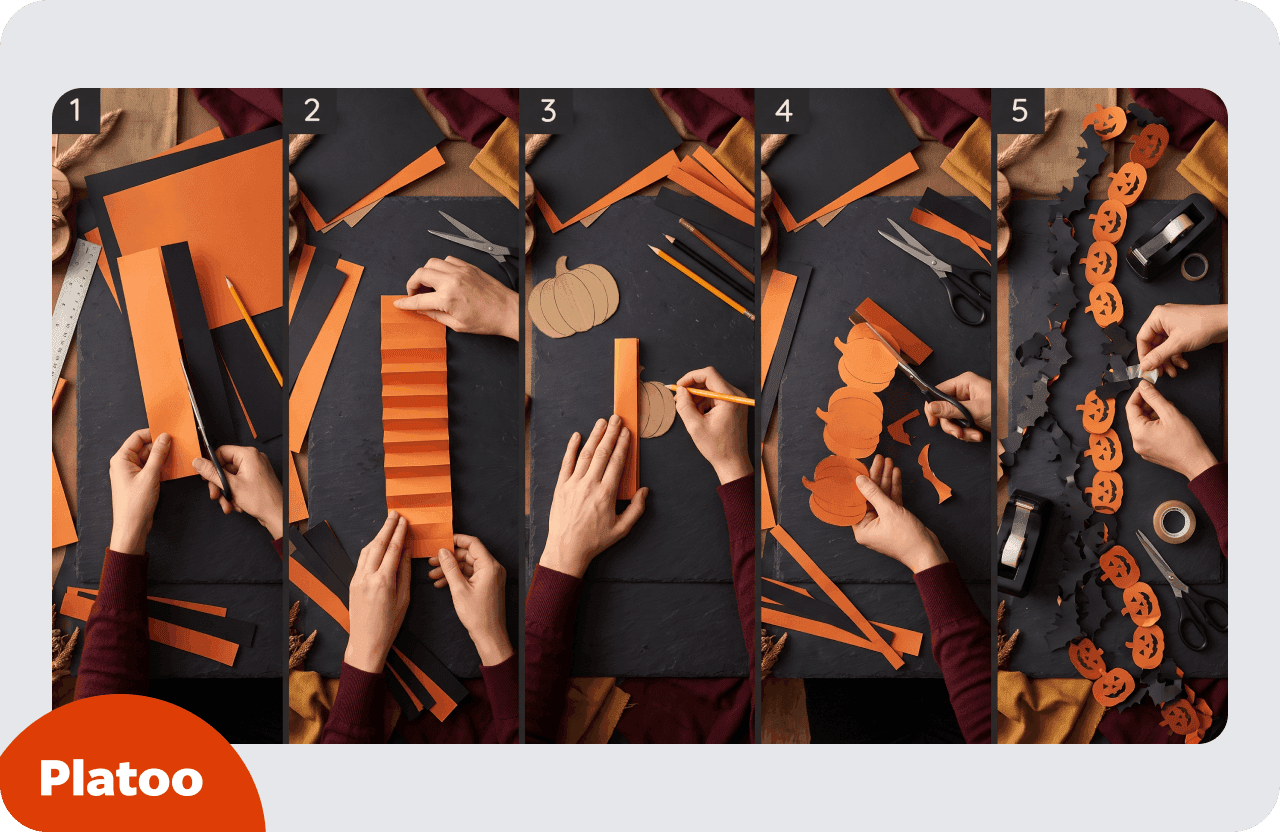
You’ll need: coloured construction paper, scissors, tape, free printable template
Time: about 1 h for several metres · Cost: Very low · Difficulty: Easy
How to make it
- Cut long strips of paper about 5 cm wide.
- Fold each strip like an accordion into equal sections.
- Place the half-shape template on the fold and trace it.
- Cut it out, but leave the folded edges uncut. Open the chain.
- Tape strips together for a longer garland.
Restaurant tip: Hang it over shelves or windows, not over open food or near light fittings that get hot.
Potion bottles
Empty spirit and syrup bottles become “potion” bottles for a high shelf behind the bar.
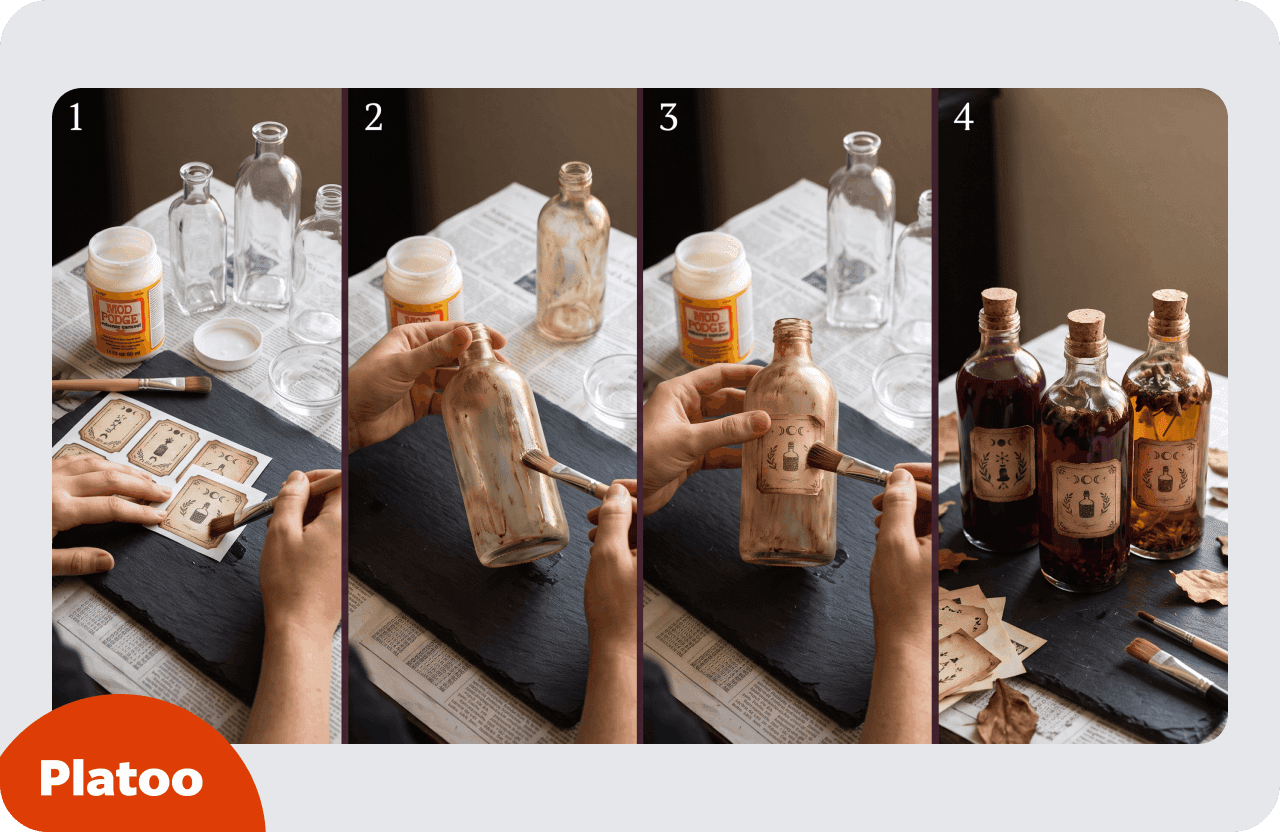
You’ll need: empty bottles, printable labels, Mod Podge, brown or grey paint, corks, coloured water or dried herbs
Time: 1–2 h + drying · Cost: Low · Difficulty: Easy
How to make it
- Print the labels and seal them with Mod Podge on both sides.
- Mix a little brown or grey paint into Mod Podge and brush it on the bottle for an old look.
- Stick on the label and add extra paint where dust would collect.
- Fill with coloured water or dried herbs and close with a cork. Skip the tutorial’s melted wax step, because it needs a flame.
Restaurant tip: Keep these bottles on a separate shelf, sealed and clearly decorative, so no one ever pours from them by mistake.
Chalkboard art
Your specials board gets a Halloween drawing next to the dish of the day.
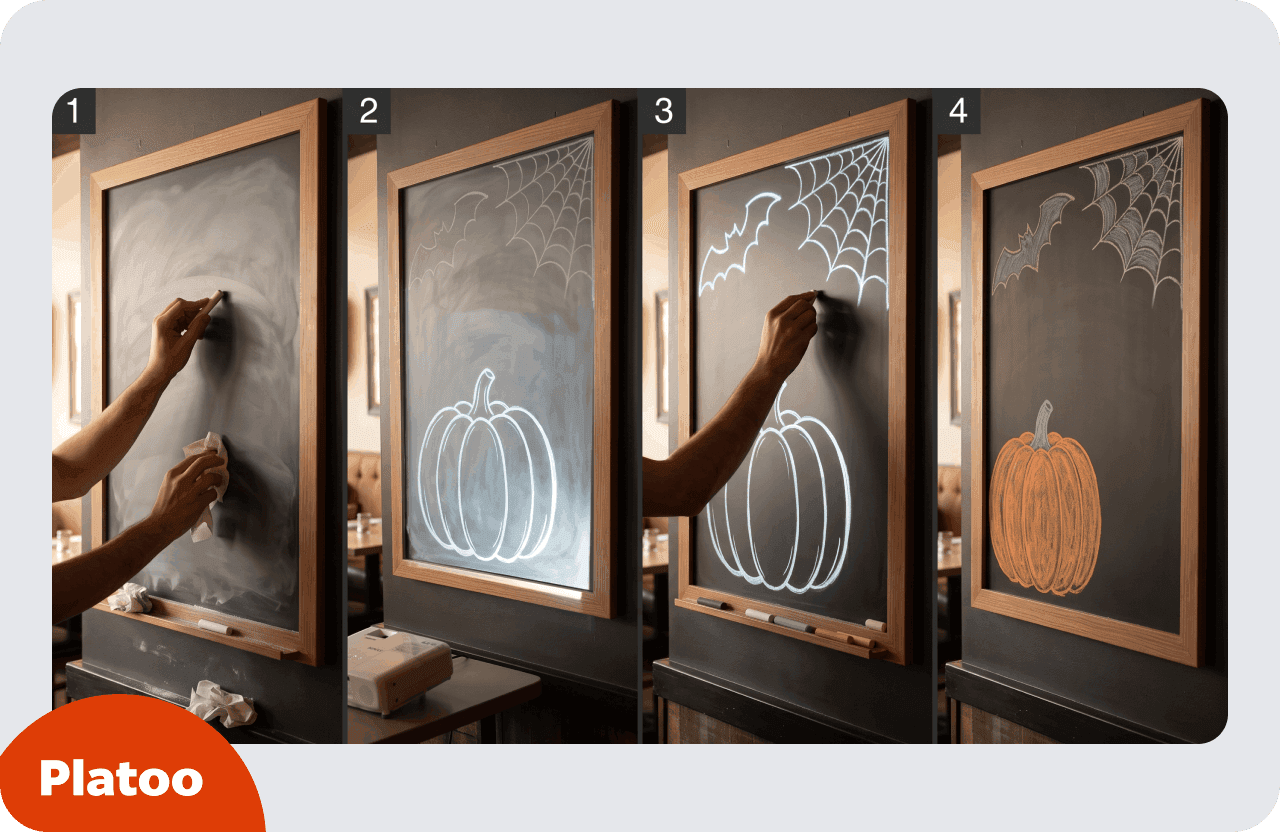
You’ll need: chalkboard (your existing specials board), chalk, projector or printed template, paper towel
Time: about 1 h · Cost: Very low · Difficulty: Easy
How to make it
- Rub the side of a chalk stick over the whole board, then wipe it in with a paper towel. This helps it erase cleanly later.
- Project the design onto the board. No projector? Rub chalk on the back of a printout, tape it up and trace over it.
- Trace the outlines in chalk.
- Fill in colour and details with sharp chalk.
Restaurant tip: Add the Halloween special to the drawing, then wipe it all off on 1 November.
We’d start with the bats. They cost almost nothing and fill a whole wall in an hour.
Lighting and table cards
The last two ideas finish the table and add soft light in the evening. Both are quick to make in a batch, so one person can do all the tables in a morning.
Halloween table cards
A small folded card stands on each table for specials, allergen notes or a QR code.
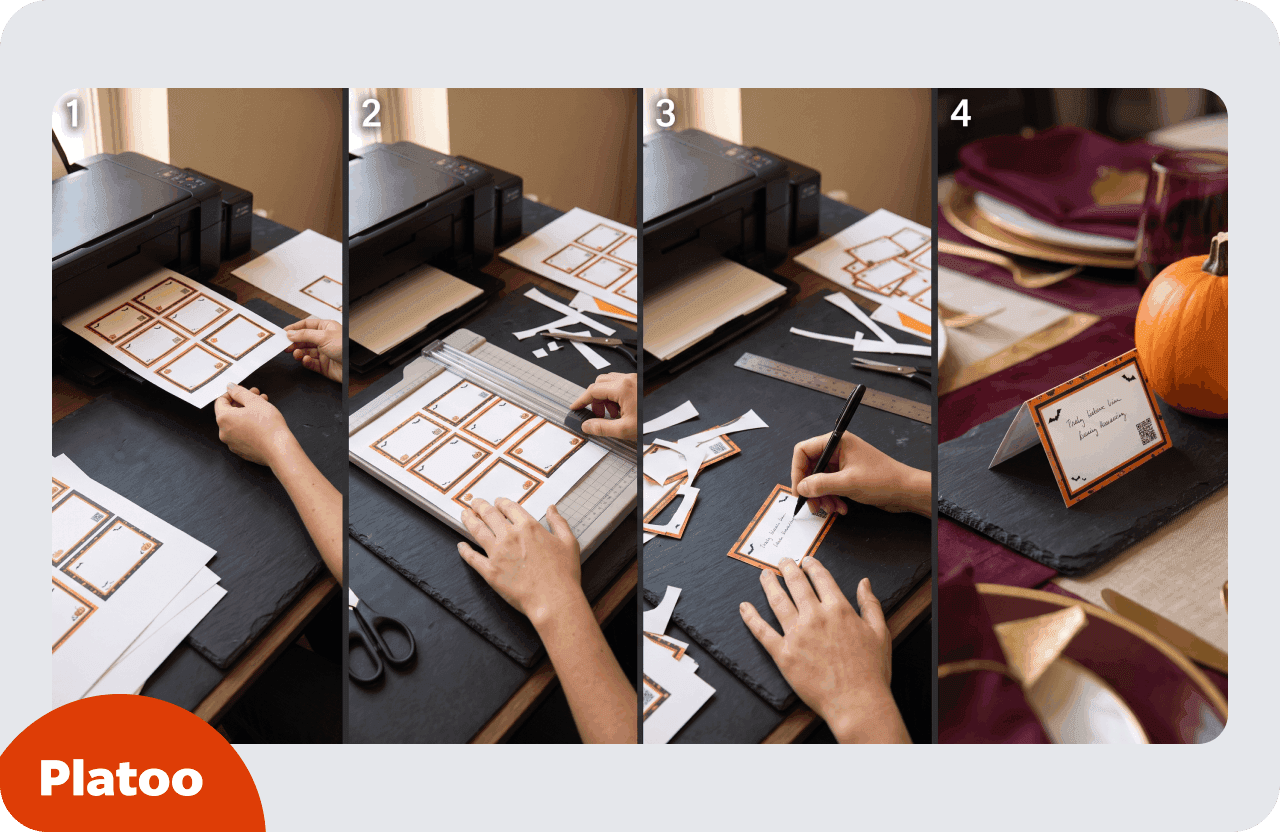
You’ll need: free printable PDF, white cardstock, printer, scissors or paper trimmer
Time: about 30 min for a batch · Cost: Very low · Difficulty: Easy
How to make it
- Print the file on white cardstock at high quality.
- Cut out each card with scissors or a trimmer.
- Write the dish, drink or message in the blank space.
- Fold along the dotted line so it stands up.
Restaurant tip: Use heavy card or laminate it, so you can wipe it clean and it lasts the whole month.
Jar lanterns
Old kitchen jars covered in tissue paper glow on tables and along the bar.
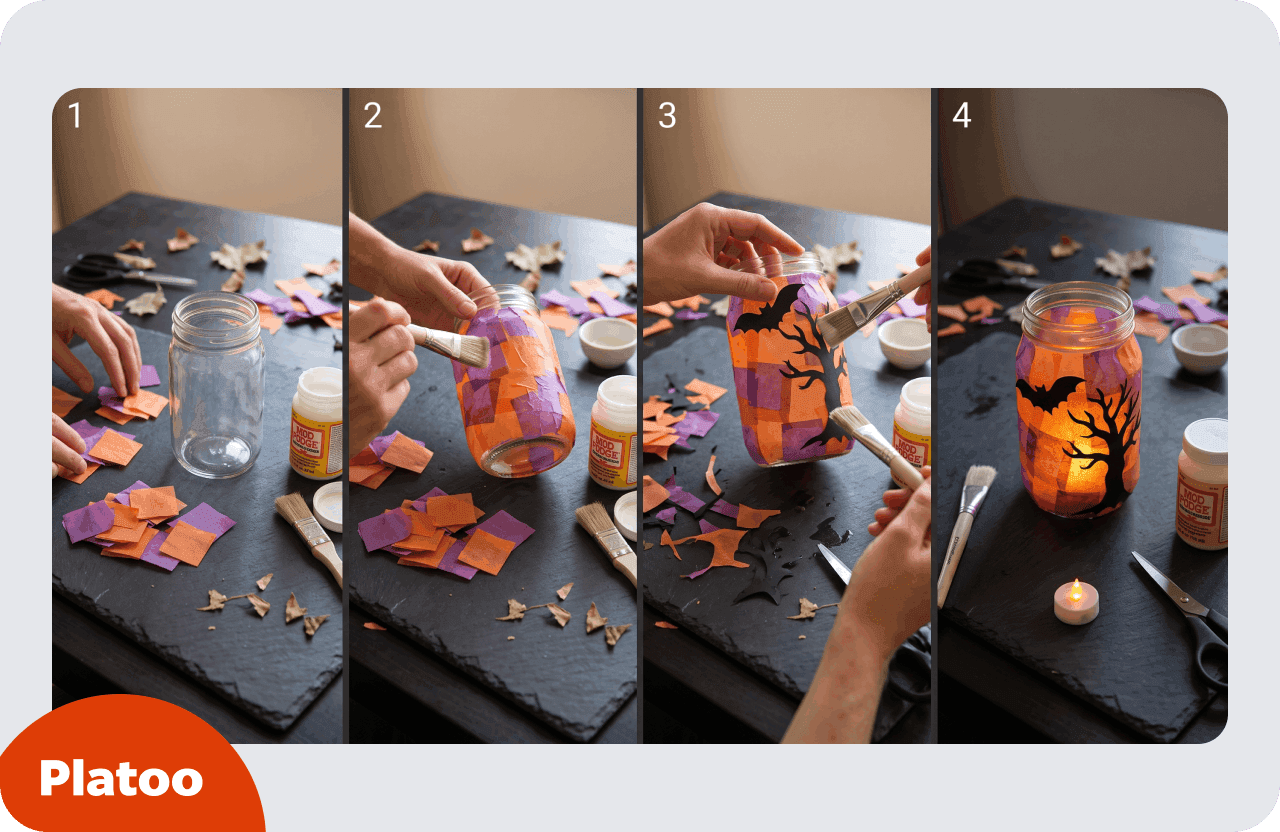
You’ll need: glass jars, tissue paper, black paper silhouettes, Mod Podge, LED tea light
Time: 30–45 min each + drying · Cost: Low · Difficulty: Easy
How to make it
- Clean the outside of the jar and cut tissue paper into small squares.
- Brush on Mod Podge, press on the tissue, and brush more on top. Overlap until the jar is covered.
- Cut a black paper silhouette, glue it on and seal it with Mod Podge.
- Let it dry, then put an LED tea light inside.
Restaurant tip: The tutorial uses a real tealight, but in a restaurant always use a battery LED one, and skip the glitter so nothing ends up in food.
Keep your DIY Halloween decorations safe
A full dining room is not a living room. You have more people, more heat and more open food. Here is what fire and food safety bodies say.
- Use LED lights, not candles. Dorset & Wiltshire Fire and Rescue says LED candles are far safer than real ones in pumpkins, lanterns and decorations. They are also cheap and don’t blow out. London Fire Brigade also suggests flameless LED candles.
- Keep decorations away from heat. NFPA advice warns that dried flowers, cornstalks and crepe paper burn very easily. Keep them well away from open flames and heat sources.
- Keep exits clear. NFPA says nothing should block escape routes. The North Carolina Office of State Fire Marshal puts it simply: “Exits are NOT an appropriate place for decorations.”
- Look after decorative lights. Dorset & Wiltshire Fire and Rescue advises not to overload sockets and to switch lights off at the socket at night.
- Keep decorations out of food areas. UK food safety guidance on gov.uk lists objects getting into food as a physical hazard. Food safety plans aim to keep foreign objects out of food, so keep glitter, paper, fabric and loose props away from prep and service areas.
Your Halloween menu
Your table card can do more than look nice. Add a QR code that opens a seasonal Halloween menu in a digital menu such as Platoo, and hide that menu after 31 October in a few clicks. On Platoo’s paid plans, a venue can keep several menus and switch between them, according to its pricing page. Automatic translation into 30+ languages also helps tourists read your specials.
Related reading
Sources: No-carve Pumpkins: DIY Painted Pumpkin Tutorial — Gorgeous Crafts · Make a Dead-Branch Centerpiece for Halloween — HGTV · Easy DIY Pumpkin Place Card Holder Tutorial — First Day of Home · How To Make Spooky DIY Halloween Window Silhouettes — Heather Paige Blog · Halloween Cheesecloth Ghost Tutorial — Elmer’s · How to Make a Giant Spider Web Using Yarn — Happy Happy Nester · Halloween – How to make DIY Paper Bats — Style at No.5 · Halloween Paper Garland Cutouts — One Little Project · Potion Bottles for Halloween DIY Apothecary Jars — Parties With A Cause · Halloween Chalk Art Tutorial (Free Printable) — Our Southern Home · Halloween Food Tent Cards – Free Printable — Gathering Beauty · How to Make Halloween Luminaries – Easy Mason Jar Lanterns — One Little Project · NFPA Halloween Fire Safety Tips — Connecticut Commission on Fire Prevention and Control · Halloween safety — Dorset & Wiltshire Fire and Rescue Service · Tips to avoid real Halloween horror: fire hazards — North Carolina Office of State Fire Marshal · Halloween costumes around candles put children at risk — London Fire Brigade · Food safety management systems — GOV.UK